Voltar para página principal

Tutorial Completo para Instalação do Firmware Vnish-NerdolaMiner

🇧🇷 PT 🇺🇸 EN 🇪🇸 ES

Complete installation tutorial for Vnish‑NerdolaMiner firmware

Passo 01
Passo 01

Getting to Know Your Miner

Identify your miner model and controller

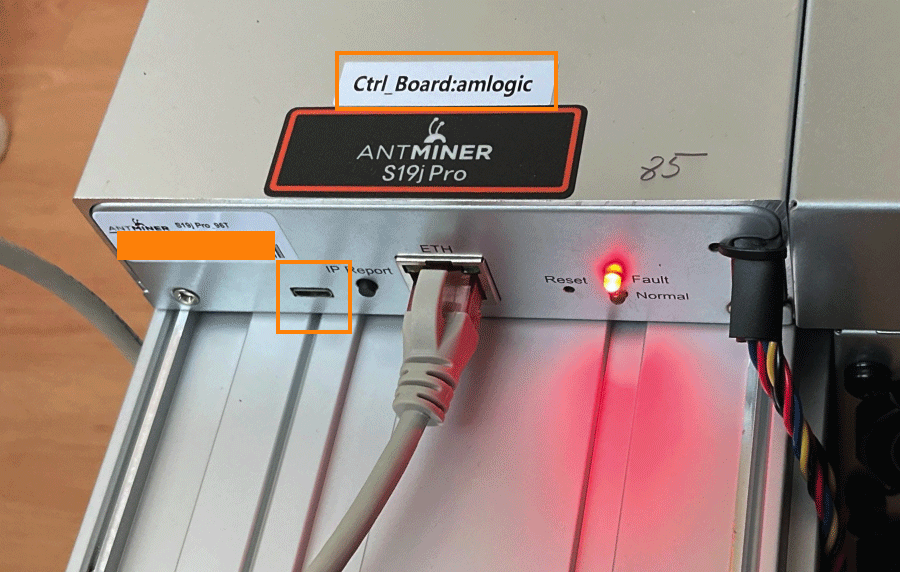
Identifying your miner is very simple. Check the label on top of your miner (red arrow). If the label is missing, look for the serial number label (green arrow). There you will also find the model identification. Once identified, proceed to the next step.

Passo 02
Passo 02

Accessing the original firmware and identifying the controller

Use your ASIC's original firmware to check the controller

On the original firmware dashboard, click on Miner Log (red arrow) to open the hardware logs.

Passo 03
Passo 03

Using CLOG and the browser search

Open the CLOG tab, press Ctrl+F or F3 on your keyboard to open the browser search, and search for one of the following terms one at a time:

  • Xilinx: “Xil” or “Xilinx”
  • Amlogic: “Amlogic” or “Aml”
  • BeagleBone: “BB” or “Beagle Bone”
  • Cevitek: “Cevitek” or “cv1835”

Do not test all terms at once; check them one by one.

Passo 04
Passo 04

Recognizing the hardware (SD slot and ports)

Confirm by hardware. Check if the board has an SD card reader. This feature varies depending on the controller.

Passo 05
Passo 05

Quick differences between controllers

Xilinx (ZYNQ): SD card reader facing outward.

BeagleBone Black: hidden SD slot, nothing exposed.

Amlogic: no SD; uses Micro-OTG next to the RJ45 port.

Cevitek: SD card reader facing outward (more shielded controller).

Passo 06
Passo 06

Installing VNISH firmware

Installation methods: The official VNISH allows installation via MicroSD (Xilinx/Cevitek), Micro-OTG (Amlogic), and NAND on all controllers. That said, we will choose installation via NAND for all controllers and models available on the market.

Why choose NAND installation?
The NAND method is a safe installation option using a tool provided by Vnish called HashCore ToolKit, which allows us to inject the firmware file directly into the controller's NAND memory, without having to physically manipulate the hardware.

Passo 07
Passo 07

Download the correct firmware for your model

On the Vnish / NerdolaMiner partner site, download the firmware for your specific model after following all the previous instructions. Select the firmware based on the model, correct controller, and the NAND installation method.

Tip: Always click the first icon in the list to download the actual firmware file.

Download firmware (Vnish / NerdolaMiner)

Passo 08
Passo 08

Creating the directory to save the firmware before Toolkit installation

Make sure your PC/laptop is on the same network as your miners and that you already know the IP range of your machines. To install Vnish on your miner, first create a folder on your computer in Local Disk C, named “NerdolaVnish”. When downloading the firmware, save it in this folder!

Passo 09
Passo 09

After creating the directory, download the HashCore ToolKit

Download and install the HashCore ToolKit on your computer so we can proceed with the installation. The software is very complete and also works as a tool to manage your miners.

Download HashCore ToolKit

Passo 10
Passo 10

Run the HashCore ToolKit

After downloading, install the software and launch it. On the software screen, click on “new group”.

Passo 11
Passo 11

In the next window, give the group a name

In the Range 1 field, fill it in according to the IP range of your miner on your local network. Usually you fill in 192.168.0.1 - 0.255 OR 192.168.1.1 - 1.255. If it's none of these ranges, check the IP address range your machine is on. Examples below:

Passo 12
Passo 12

After filling in, click “Save and Scan”

The toolkit will create the group with the available machines within the IP range we registered, as shown in the image below:

Passo 13
Passo 13

After identifying the machine on the network

Select the checkbox next to the machine's name corresponding to the installation. After selecting, click “All commands” and then “install firmware”.

Passo 14
Passo 14

In the next window (see image), select the folder

Click the “select” button and choose the folder we created on local disk C:/ named “NerdolaVnish”. After selecting the folder, in “Firmware Build Name” type “NerdolaMiner” and in “Firmware Version” enter the current version (1.2.6).

Passo 15
Passo 15

Finalize the installation

No need to change other fields. Just click on “Install Firmware”, then click “Yes” in the next window, and wait for the process to finish. You can monitor progress by clicking on “operations” at the top of the screen. When complete, a green success message will appear on the right side.

Passo 16
Passo 16

Installation completed!

After that, open an incognito tab in your browser, enter the IP of the machine where you installed the firmware, and access the new interface already running VNISH. Click in the upper right corner on “Unlock” — the default access password is “admin”.

Passo 17
Passo 17

Explore and adjust your miner as needed for perfect operation!

Back to main page